def draw_n(n:int, # Number of cards to draw
replace:bool=True # Draw with replacement?
)->list: # List of cards
"Draw `n` cards."笔记本最佳实践
笔记本提供的灵活性可能令人应接不暇。虽然存在编写 Python 包的行业标准——比如 numpy 和 sphinx docstrings,以及 pytest 和 unittest 测试框架——但它们并非为笔记本设计。
本文将引导您了解我们学习到的实践方法,以利用 nbdev 充分发挥笔记本的强大功能1。我们的方法将代码、测试和文档编织到单一的交互式上下文中,从而鼓励实验。如果您喜欢通过示例学习,您可能希望从带注释的示例开始,然后由此深入了解。

了解您正在编写的笔记本类型
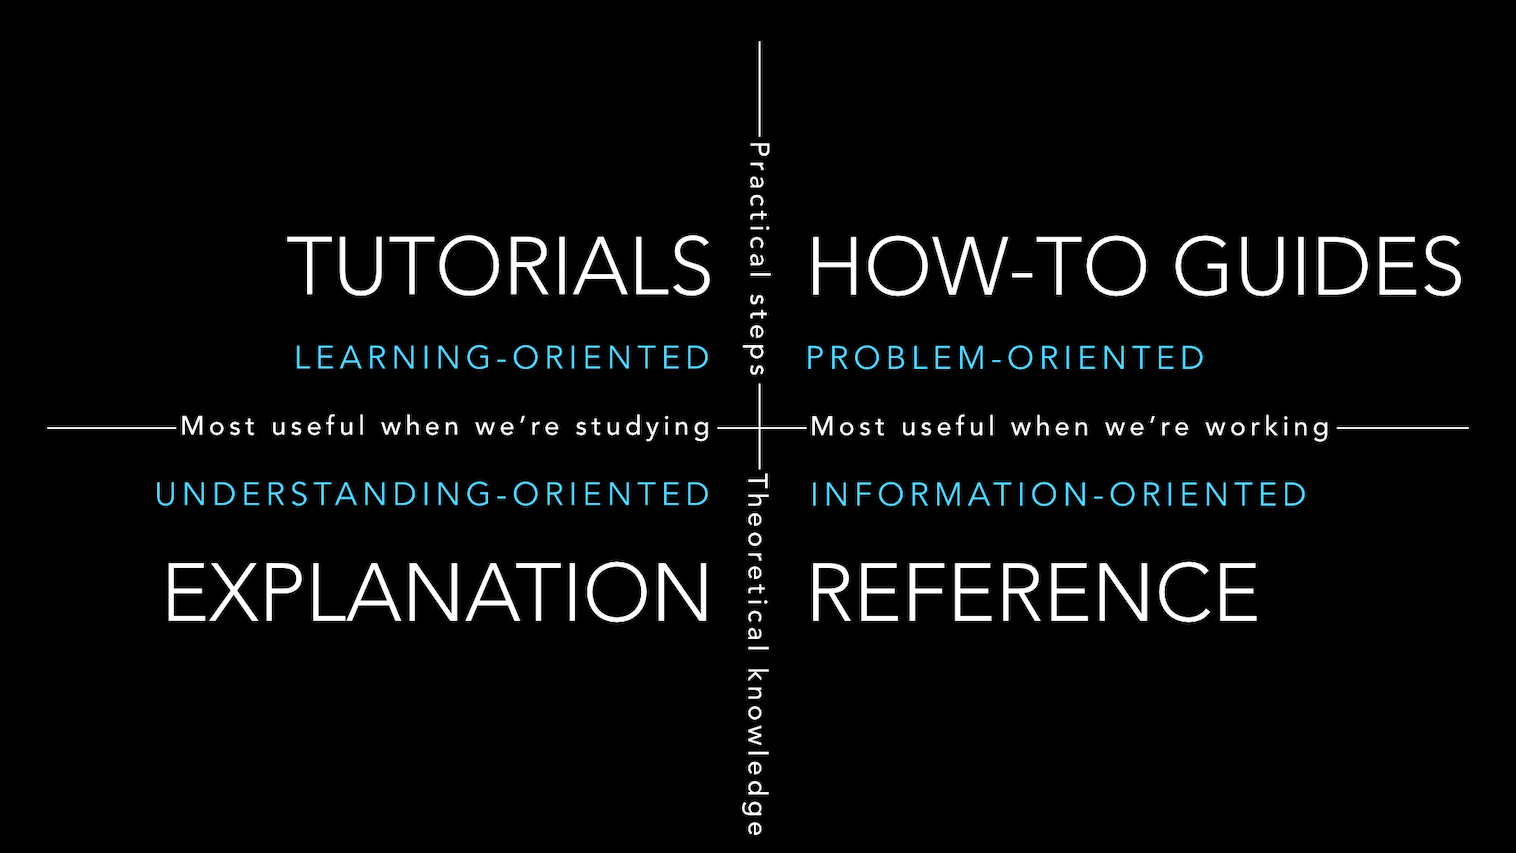
首先,确定您正在编写的笔记本类型。我们是 Diátaxis 系统的拥趸,它将文档分为四种形式:教程、操作指南、解释和参考。他们在下图中精美地展示了这一点
从出色的标题和副标题开始
在笔记本顶部使用 Markdown 单元格开始,将标题放在 H1 标题中,副标题放在块引用中。例如
# Great title

> And an even better subtitle
该标题也将用于在侧边栏中引用您的页面。您还可以选择性地在该单元格中添加 frontmatter,以自定义 nbdev 和 Quarto。
介绍您的笔记本
在标题下方的 Markdown 单元格中介绍您的笔记本。我们根据文档的类型推荐略有不同的方法
- 参考: 以对技术组件的简要描述开始,以及链接到页面中主要符号的概述(您可能希望使用 doclinks)
- 教程和操作指南: 描述读者将学到什么以及如何学习。保持简短并快速进入主题
- 解释: 由于这些通常非常集中,对主题进行简短描述通常就足够了。
请注意,像上面这样的 Markdown 列表需要在它们上方有一个空行才能在文档中呈现为列表,即使笔记本查看器会渲染前面没有空行的列表。
使用大量代码示例、图片、图表和视频
通过包含代码示例、图片、图表和视频,利用笔记本的丰富性。
这里有一些示例供您参考
- fastai 的文档大量使用了代码示例、图表、图片和表格,例如 计算机视觉入门
nbdev.release以 SVG 格式的终端屏幕录像演示开头,使用 asciinema 和 svg-term-cli 创建- 文档解释 描述了一个复杂的数据管线,使用 Mermaid 图表
- 指令解释 展示了 nbdev 的所有指令,在标注卡片中带有可执行示例(并且很好地使用了表情符号!)
- RDKit 渲染出漂亮的分子图
保持 docstrings 简短;在单独的单元格中详细阐述
虽然 nbdev 将 docstrings 渲染为 markdown,但在使用 symbol? 或 help(symbol) 时,它们无法正确渲染,并且它们不能包含已执行的代码。通过将较长的 docstrings 分割到单独的代码和 markdown 单元格中,您可以使用代码示例、图片、图表和视频。
我们发现对于大多数 docstrings 而言,单行摘要就足够了。
使用 docments 记录参数
fastcore.docments 是一种记录参数的简洁方式,并由 nbdev 精美地渲染。例如,以下函数
…将包含以下表格作为其文档的一部分
| 类型 | 默认值 | 详情 | |
|---|---|---|---|
| n | int | 要抽取的卡片数量 | |
| replace | bool | True | 是否替换抽取? |
| 返回 | list | 卡片列表 |
nbdev 也支持某些 numpy docstring 部分。例如,此代码片段会生成相同的表格(如果您已经有类型注解,则无需像在 docstring 中那样包含类型)
def draw_n(n:int, replace:bool=True) -> Cards:
    """
    Draw `n` cards.

    Parameters
    ----------
    n
        Number of cards to draw
    replace
        Draw with replacement?

    Returns
    -------
    cards
        List of cards
    """
您可以使用 DocmentTbl 直接渲染符号的参数表。事实上,上面的表格就是这样渲染的。
保持代码单元格简短,并立即演示它们
在笔记本中,不要创建带有穿插注释的长函数和类。而是将代码拆分成小的独立单元格,并在每个单元格后附带解释和工作示例。这让用户能够立即理解每个部分的运作方式并进行实验。这也有助于您在开发过程中,因为您可以交互式地探索代码每个部分的行动。
在非笔记本编码中,文档、测试、代码和示例都是分开的。使用 nbdev 则不同。利用这一点,将所有这些内容尽可能地紧密放在一起。这对于探索和文档编制都很有帮助。
例如,考虑 Claudette 源代码笔记本中关于实现图像支持的部分。该部分立即导入并显示一张图片,展示如何处理文件格式。然后创建一些辅助函数,并对其进行描述和演示,最后将所有内容组合起来,展示如何在笔记本中直接运行真实输入和输出,从而实际使用完整功能。
为了避免因方法过多导致类定义过长,考虑使用 fastcore 的 patch 装饰器单独实现每个方法,并立即对其进行文档记录、演示和测试。
考虑通过添加断言将代码示例转为测试
nbdev 模糊了代码、文档和测试之间的界限。每个代码单元格都会作为测试运行(除非另有明确标记),单元格中的任何错误都会导致测试失败。
如果它们能构成有价值的测试且不影响可读性的话,考虑通过添加断言将代码示例转为测试。fastcore.test 提供了一组围绕 assert 的轻量级封装器,用于改进笔记本测试(例如,如果对象不同,它们会在错误时打印出这两个对象)。
以下是使用 fastcore.test.test_eq 的示例
def inc(x): return x + 1
test_eq(inc(3), 4)
将错误情况记录为测试
基于 docstring 的方法通常使用纯文本描述来记录对象引发的错误,例如,在“raises”部分中。
在 nbdev 中,我们推荐使用实际失败的代码来记录错误,使用 fastcore.test.test_fail。例如
def divide(x, y): return x / y
test_fail(lambda: divide(1, 0), contains="division by zero")
第一个参数是一个 lambda,因为我们需要允许 test_fail 控制其执行并捕获任何错误。
为您的类添加富文本表示
这是利用笔记本的富文本显示功能的另一种方式。您可以通过定义一个返回 markdown 文本的 _repr_markdown_ 方法(其中可能也包含 HTML/CSS),为您的对象提供富文本表示。
以下是一个简单的示例供您参考
class Color:
    def __init__(self, color): self.color = color
    def _repr_markdown_(self):
        style = f'background-color: {self.color}; width: 50px; height: 50px; margin: 10px'
return f'<div style="{style}"></div>'Color('green')Color('blue')另请参阅前面提到的示例项目列表,它们使用了漂亮的视觉表示。
使用 show_doc 或 fastcore.basics.patch 文档类方法
nbdev 使用 show_doc 自动文档导出函数和类定义。然而,文档类方法取决于您。有两种方法可以做到:对方法调用 show_doc,或使用 fastcore.basics.patch 装饰器定义方法。
如果您的类定义在单个单元格中,使用 show_doc。您的笔记本可能看起来像这样
#| export
class Number:
    "A number."
    def __init__(self, num): self.num = num
    def __add__(self, other):
        "Sum of this and `other`."
        return Number(self.num + other.num)
    def __repr__(self): return f'Number({self.num})'
例如,这里是数字 5
Number(5)show_doc(Number.__add__)例如
Number(3) + Number(4)如果您使用 fastcore.basics.patch 将类定义拆分到多个单元格中,您的笔记本可能看起来像这样
#| export
class Number:
    "A number."
    def __init__(self, num): self.num = num
    def __repr__(self): return f'Number({self.num})'
例如,这里是数字 5
Number(5)#| export
@patch
def __add__(self:Number, other):
"Sum of this and `other`."
return Number(self.num + other.num)例如
Number(3) + Number(4)无论哪种情况,文档都将这样渲染
数字
Number (num)
一个数字。
例如,这里是数字 5
Number(5)Number(5)Number.__add__
Number.__add__ (other)
与此和 other 的和。
例如
Number(3) + Number(4)Number(7)使用 H2 节分组符号
随着您的笔记本增长,考虑使用带有 2 级标题的 markdown 单元格分组相关符号。由于 nbdev 将文档化的符号显示为 3 级标题,这将把所有符号分组到 2 级标题下方。
以下是 markdown 语法
## Section title用 H4 节拆分长解释
类似于上一节,随着符号解释的增长,考虑使用 4 级标题对其单元格进行分组。这是构建参考文档的推荐方式,例如,以实现 numpy 风格的结构,包含诸如注意事项、示例、方法等部分。
以下是 markdown 语法
#### Section title融会贯通:一个带注释的示例
在本节中,我们将引导您完成一个完整的示例,关于如何在笔记本中编写带有文档和测试的函数,使用上述所有原则。我们将使用 numpy.all 函数,因为它遵循用于 .py 文件的广为人知的 numpy-docstring 标准。
以下是 numpy.all 函数的定义。请注意所有信息都如何包含在 docstring 中。虽然这对于 .py 文件效果很好,但它不允许我们将可执行代码与富文本 markdown 编织在一起,就像在笔记本中那样
def all(a, axis=None, out=None, keepdims=np._NoValue, *, where=np._NoValue):
    """
    Test whether all array elements along a given axis evaluate to True.
    Parameters
    ----------
    a : array_like
        Input array or object that can be converted to an array.
    axis : None or int or tuple of ints, optional
        Axis or axes along which a logical AND reduction is performed.
        The default (``axis=None``) is to perform a logical AND over all
        the dimensions of the input array. `axis` may be negative, in
        which case it counts from the last to the first axis.
        .. versionadded:: 1.7.0
        If this is a tuple of ints, a reduction is performed on multiple
        axes, instead of a single axis or all the axes as before.
    out : ndarray, optional
        Alternate output array in which to place the result.
        It must have the same shape as the expected output and its
        type is preserved (e.g., if ``dtype(out)`` is float, the result
        will consist of 0.0's and 1.0's). See :ref:`ufuncs-output-type` for more
        details.
    keepdims : bool, optional
        If this is set to True, the axes which are reduced are left
        in the result as dimensions with size one. With this option,
        the result will broadcast correctly against the input array.
        If the default value is passed, then `keepdims` will not be
        passed through to the `all` method of sub-classes of
        `ndarray`, however any non-default value will be.  If the
        sub-class' method does not implement `keepdims` any
        exceptions will be raised.
    where : array_like of bool, optional
        Elements to include in checking for all `True` values.
        See `~numpy.ufunc.reduce` for details.
        .. versionadded:: 1.20.0
    Returns
    -------
    all : ndarray, bool
        A new boolean or array is returned unless `out` is specified,
        in which case a reference to `out` is returned.
    See Also
    --------
    ndarray.all : equivalent method
    any : Test whether any element along a given axis evaluates to True.
    Notes
    -----
    Not a Number (NaN), positive infinity and negative infinity
    evaluate to `True` because these are not equal to zero.
    Examples
    --------
    >>> np.all([[True,False],[True,True]])
    False
    >>> np.all([[True,False],[True,True]], axis=0)
    array([ True, False])
    >>> np.all([-1, 4, 5])
    True
    >>> np.all([1.0, np.nan])
    True
    >>> np.all([[True, True], [False, True]], where=[[True], [False]])
    True
    >>> o=np.array(False)
    >>> z=np.all([-1, 4, 5], out=o)
    >>> id(z), id(o), z
    (28293632, 28293632, array(True)) # may vary
    """
    ...
或者,以下是我们在笔记本中使用 nbdev 编写 numpy.all 的方式。第一步是定义函数
#| export
def all(a, # Input array or object that can be converted to an array.
        axis:int|tuple|None=None, # Axis or axes along which a logical AND reduction is performed (default: all).
        out:np.ndarray|None=None, # Alternate output array in which to place the result.
        keepdims:bool=np._NoValue, # Leave reduced one-dimensional axes in the result?
        where=np._NoValue, # Elements to include in reduction. See `numpy.ufunc.reduce` for details. New in version 1.20.0.
        ) -> np.ndarray|bool: # A new boolean or array, or a reference to `out` if its specified.
    "Test whether all array elements along a given axis evaluate to `True`."
    ...
我们可以观察到此代码与 numpy-docstrings 之间的以下区别
- 定义使用简单的类型注解,它们将渲染在下面的函数参数表中
- 参数通过简短注释描述,称为 docments——是 numpy 和 sphinx docstring 格式的简洁替代方案(尽管 nbdev 也支持 numpy docstrings,请参阅此示例)
- docstring 和参数描述都很简短,是单行摘要。我们倾向于保持 docstrings 简短,而是在单独的单元格中详细阐述,在那里我们可以使用 markdown 和真实的 Shall 代码示例。
注意:使用 | 语法表示联合类型(例如 int|tuple|None,等同于 Union[int, tuple, None])需要使用 Python 3.10 或使用 from __future__ import annotations 将所有注解视为字符串,这在 Python 3.7 及更高版本中可用。
我们的函数定义在文档中会自动像这样渲染。请注意,参数名称、类型、默认值和详情都从定义中解析而来,这意味着您无需重复自己。
all
 all (a, axis:Union[int,tuple,NoneType]=None,
      out:Optional[numpy.ndarray]=None, keepdims:bool=<no value>,
      where=<no value>)
测试给定轴上的所有数组元素是否求值为 True。
| 类型 | 默认值 | 详情 | |
|---|---|---|---|
| a | 输入数组或可转换为数组的对象。 | ||
| axis | int | tuple | None | None | 执行逻辑与(AND)归约运算所沿着的轴或多个轴(默认:所有)。 |
| out | np.ndarray | None | None | 用于存放结果的备用输出数组。 |
| keepdims | bool | 结果中是否保留被归约的一维轴? | |
| where | _NoValueType | 要包含在归约运算中的元素。详情请参阅 numpy.ufunc.reduce。版本 1.20.0 中新增。 |
|
| 返回 | np.ndarray | bool | 一个新的布尔值或数组,或者,如果指定了 out,则返回其引用。 |
接下来,描述如何使用您的函数,使用 markdown 单元格和大量代码示例。这是在笔记本中开发的最大优势:而不是将代码示例复制粘贴到纯文本中,您可以包含真实的可执行代码示例。
我们首先从基本用法开始
例如
x = [[True,False],[True,True]]
test_eq(np.all(x), False)我们的代码示例使用 fastcore.test 中的断言函数,以便它们既作为文档又作为测试。nbdev_test 将每个代码单元格作为测试运行(除非另有明确标记),单元格中的任何错误都会导致测试失败。
描述完基本用法后,我们现在详细阐述每个参数更高级的功能。这与 numpy 的方法不同,后者将所有参数文档包含在表格中,并且并非所有参数都有代码示例。
使用 axis
test_eq(np.all(x, axis=0), [True,False])axis 可能是负数,在这种情况下,它从最后一个轴数到第一个轴
test_eq(np.all(x, axis=-1), [False,True])如果 axis 是一个整数元组,则在多个轴上执行归约运算,而不是像之前那样在单个轴或所有轴上执行。
test_eq(np.all(x, axis=(0,1)), False)整数、浮点数、非数字 (nan) 和无穷大都求值为 True,因为它们不等于零
test_eq(np.all([-1, 1, -1.0, 1.0, np.nan, np.inf, -np.inf]), True)您可以使用 where 测试特定元素。例如,这只测试第二列
test_eq(np.all(x, where=[[False],[True]]), True)输出可以存储在可选的 out 数组中。如果提供,将返回 out 的引用
o = np.array(False)
z = np.all([-1, 4, 5], out=o)
test_is(z, o)
test_eq(z, True)
out 必须与预期输出具有相同的形状,并且其类型会被保留(例如,如果 dtype(out) 是浮点型,结果将由 0.0 和 1.0 组成)。详情请参阅输出类型确定。
使用 keepdims,结果将能正确地与输入数组广播。
test_eq(np.all(x, axis=0, keepdims=True), [[True, False]]) # Note the nested list如果传递默认值,则 keepdims 将不会传递给 ndarray 子类的 all 方法,但任何非默认值都会传递。如果子类的方法未实现 keepdims,则会引发异常。
class MyArray(np.ndarray):
    def all(self, axis=None, out=None): ...

y = MyArray((2,2))
y[:] = x
np.all(y) # No TypeError since `keepdims` isn't passed
test_fail(lambda: np.all(y, keepdims=True), contains="all() got an unexpected keyword argument 'keepdims'")
由于我们倾向于通过代码示例进行文档记录,我们也使用 fastcore.test.test_fail 通过断言记录错误情况。这与基于 docstring 的方法不同,后者通常以散文形式记录错误情况,通常在 docstring 的“raises”部分中。
最后,我们使用doclinks 链接到相关符号(用反引号包围的符号会自动链接),并使用代码示例描述它们的关系。
numpy.ndarray.all 方法等同于使用数组调用 numpy.all
test_eq(np.array(x).all(), np.all(x))相比之下,numpy.any 测试是否任何元素求值为 True(而不是所有元素)
test_eq(np.any(x), True)总结
总而言之,以下是 nbdev 版本 numpy.all 与 numpy docstring 的不同之处。nbdev 使用
- 类型注解和 docments,而不是 numpy docstring 格式(尽管 nbdev 也支持 numpy docstrings)
- 简短的参数描述,详细内容放在带有 markdown 和代码示例的单独单元格中
- 指向相关符号的 doclinks,而不是“另请参阅”部分
- 大量代码示例(它们也是测试),与散文混在一起,描述如何使用函数
- 带有断言的代码示例,用于记录错误情况,而不是“Raises”部分。
